Perfectly dried deer jerky offers a unique combination of flavor and texture, making it a favorite snack for many. Whether you’re a seasoned jerky maker or trying this for the first time, this guide will show you how to dry deer jerky in the oven step by step.
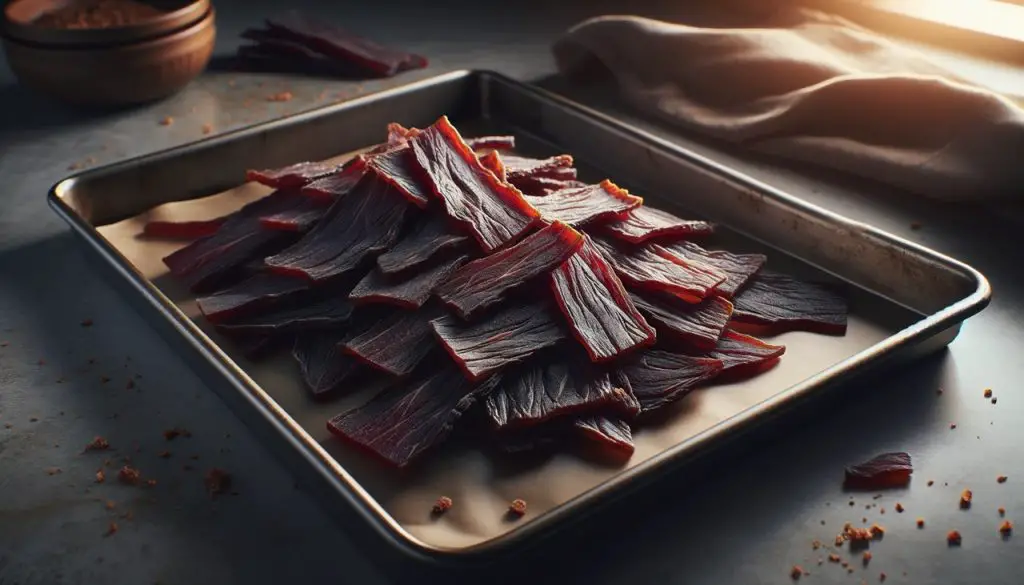
Table of Contents
Things You’ll Need: How to Dry Deer Jerky in the Oven
- Deer meat (preferably lean cuts)
- Large cutting board
- Sharp knife
- Parchment paper
- Marinade ingredients (as per your recipe choice)
- Non-stick baking sheets or wire racks
- Paper towels
- Oven with low-temperature setting capability
- Meat thermometer
- Airtight containers for storage
How to Dry Deer Jerky in the Oven: Step-by-Step Instructions
Follow the steps below to dry deer jerky in the oven
1. Preparing the Meat
The first step in drying deer jerky is to choose the right kind of meat. Ideally, you should select lean cuts of deer meat. Lean cuts are preferable because they have less fat. Fat is not only more difficult to dry but also prone to rancidity, which can spoil your jerky quicker than desired.
Begin by laying out the meat on a large, clean cutting board. Using a sharp knife, carefully trim off any visible fat from the meat. This step requires patience and a steady hand to ensure that most of the fat is removed while retaining the meat’s integrity.
Once the meat is trimmed, the next important step is slicing. The goal is to cut the meat into thin, uniform slices, approximately ¼ inch thick. Uniformity in thickness is key for even drying. If the slices vary too much in thickness, they will dry at different rates, leading to some pieces being over-dried while others may remain underdone.
To achieve consistent thickness, hold your knife at a consistent angle and apply even pressure as you slice. For easier slicing, you can partially freeze the meat beforehand, as slightly firm meat is easier to cut into even slices.
2. Marinating the Meat
After slicing, marinating is your next crucial step. The marinade not only imparts flavor to the jerky but also plays a role in preservation. Begin by choosing a marinade recipe.
There are numerous recipes available, ranging from simple salt and pepper mixes to more complex blends involving soy sauce, Worcestershire sauce, garlic, onion, and various spices. Whichever recipe you choose, make sure to prepare enough marinade to thoroughly coat all your meat slices.
Place the meat slices in a large bowl or resealable plastic bag and pour the marinade over them. Use your hands or tongs to gently toss the meat in the marinade, ensuring each piece is well-coated. This thorough coating is crucial for flavor consistency across all pieces of jerky. Once coated, seal the bowl or bag and place it in the refrigerator.
Marinating should be done in the refrigerator to prevent bacterial growth at room temperature. Let the meat marinate for at least 4 hours, though marinating overnight is preferable. The extended time allows the flavors to deeply infuse into the meat, resulting in a more flavorful jerky.
During the marinating process, you may occasionally toss or turn the meat to ensure that all sides are equally exposed to the marinade. This attention to detail will ensure that every slice of jerky is equally flavorful and delicious.
3. Preparing for Drying
The next step in making deer jerky is to prepare for the drying process. Begin by preheating your oven. Set it to the lowest possible temperature, which is typically around 160°F (70°C). This low temperature is crucial as it ensures that the meat dries slowly and evenly without cooking. While your oven is warming up, you can prepare the meat for drying.
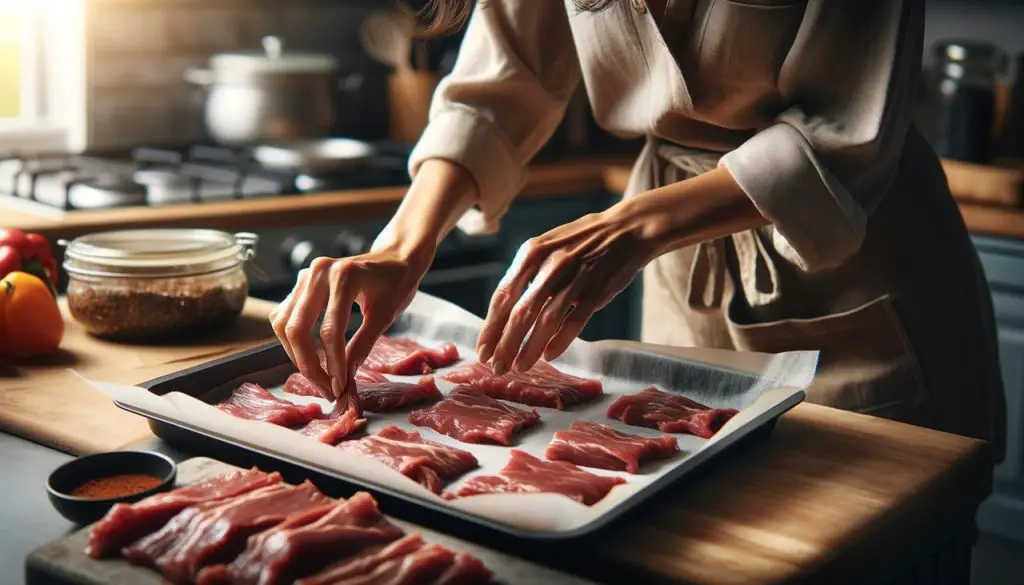
Take the marinated meat out of the refrigerator. Remove the meat slices from the marinade and lay them out on a clean surface. Using paper towels, gently pat each piece of meat dry. This step is important because removing the excess marinade helps in achieving a consistent dryness in the finished jerky. Be thorough but gentle to avoid tearing the meat.
Now, arrange the meat slices on non-stick baking sheets or wire racks for drying. If you’re using baking sheets, you might consider lining them with parchment paper for easier cleanup. When placing the meat on the sheets or racks, make sure that the slices do not overlap.
Overlapping can cause uneven drying, as the areas covered by other slices won’t have as much exposure to the dry heat of the oven. Arrange the slices in a single layer, leaving a little space around each piece to allow for air circulation. This spacing is key to ensuring that all parts of the meat dry at the same rate.
Read more on oven drying here – How to Oven Dry Stuff: Your Ultimate Guide to Drying Various Items in the Oven
4. Drying the Jerky
With your meat prepared and your oven preheated, it’s time to start the drying process. Carefully place the baking sheets or racks in the oven. To facilitate proper drying and to allow moisture to escape, it’s recommended to leave the oven door slightly ajar. You can prop the door open with a small oven-safe item like a wooden spoon.
The duration of the drying process can vary significantly. It typically takes between 4 to 8 hours, but this timing depends on several factors, including the thickness of your meat slices, the exact temperature of your oven, and even the humidity in your kitchen. Since these variables can affect drying time, it’s important to check on the meat periodically.
About halfway through the drying process, open the oven and carefully flip each slice of meat. This flipping ensures that both sides of the meat dry evenly. Handle the meat gently to avoid tearing or deforming the slices.
When you check the meat, also look for any signs of uneven drying. If some pieces are drying faster than others, you may need to rearrange them for more uniform exposure to the oven’s heat.
Remember, the goal is to dry the meat, not cook it. The jerky is done when it is firm and leathery but still pliable. It shouldn’t be so dry that it becomes brittle and cracks. Achieving this balance is the key to delicious, homemade deer jerky.
5. Testing for Doneness
Knowing when your deer jerky is perfectly done is crucial for both taste and safety. The ideal consistency of jerky is a balance between leathery and pliable. To test for doneness, take a piece of jerky and bend it gently. It should flex and crack but not break into pieces. This indicates that the moisture has been adequately removed, leaving behind the perfect chewy texture.
However, texture isn’t the only consideration. Safety is paramount when preparing jerky. Use a meat thermometer to check the internal temperature of the jerky. It’s important that it reaches 160°F (70°C).
This temperature is high enough to kill any harmful bacteria that might be present in the meat. To check, insert the thermometer into the thickest part of a jerky slice. Ensure that you test multiple pieces to confirm uniform doneness.
6. Storing the Jerky
Once your jerky has achieved the right texture and temperature, it’s time to store it. Begin by removing the jerky from the oven. Let it cool at room temperature. Cooling is important as it stops the drying process and prepares the jerky for storage.
After the jerky has cooled, store it in airtight containers. These can be resealable plastic bags, glass jars, or vacuum-sealed bags, which are especially effective in extending shelf life. Proper sealing is crucial to prevent moisture from getting back into the jerky, which can lead to spoilage.
When stored in an airtight container, deer jerky can be kept at room temperature for about two weeks. If you wish to keep it for a longer period, refrigeration is a good option. In the refrigerator, jerky can last for several months.
For even longer storage, you can freeze the jerky. When frozen, it can last for up to a year. Keep in mind that the quality of the jerky might decrease over time, so it’s often best enjoyed within a few months.
Remember, before consuming jerky that has been stored for an extended period, check it for any signs of spoilage like mold or an off smell. By storing your deer jerky properly, you can enjoy this homemade snack over a significant period, ensuring that your effort in making it is well rewarded.
Conclusion: How to Dry Deer Jerky in the Oven
Drying deer jerky in the oven is a rewarding process that yields a delicious, high-protein snack. By following these steps, you can ensure your jerky is safe, tasty, and perfectly dried. Enjoy your homemade deer jerky with the satisfaction of having made it yourself!