The Kitchenaid oven self clean feature is useful for those who don’t like taking time to clean their ovens. In this article, we will talk about the Kitchenaid oven self clean feature.
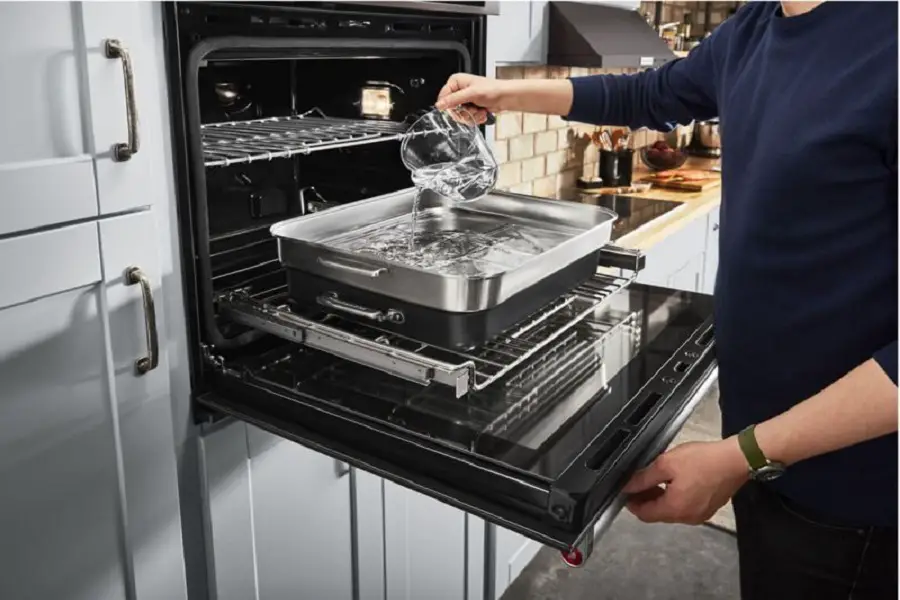
Table of Contents
Kitchenaid Oven Self Clean — How To Use
Below, we have listed the steps you need to follow in order to use the Kitchenaid oven self clean feature…
Step 1: Open the door of the oven.
Step 2: Take out the racks and any other cookware or accessories in the oven.
Step 3: Using a paper towel, wipe off any loose bits of food to prevent the oven from smoking too much.
Step 4: Shut the door.
Step 5: Remove any cookware from the cook top and broiler drawer.
Step 6: Press the “more” or “settings” button.
Step 7: Scroll the through the options and select “Self Clean”. If your oven is a double oven, select which one you would like to clean.
Step 8: Scroll through the options on the display to select low, medium, or high cleaning depending on how dirty your oven is. You can also do this with the “+” and “-” buttons or up and down arrows.
Step 9: Press “Start”.
Step 10: Open all the windows in your home to make sure any smoke from the oven isn’t trapped.
Step 11: During the self clean feature, make sure no one goes close to the oven as it will be very hot. Also keep pets away. The fumes from the oven could harm them.
Step 12: Once the self clean cycle is over, leave the oven to cool down.
Step 13: Once the oven has cooled down, open the door and wipe out the ash using a damp cloth.
Step 14: Return the racks and any other accessories to the oven and broiler drawer.
Follow the steps above to clean your Kitchenaid self cleaning oven.
Watch the video below for a visual of how to use the Kitchenaid oven self clean feature.
Kitchenaid Double Wall Oven Won’t Self Clean — How To Fix
If your Kitchenaid double oven won’t self clean, first make sure that the oven has cooled down to room temperature. Also make sure not to self clean the two ovens at once. If you try self cleaning the two ovens at the same time, it won’t work. If you have checked these things and your oven still won’t self clean, the door lock motor may be faulty.
If the motor is faulty, the door won’t lock. This will prevent your Kitchenaid oven from self cleaning. Below, we have listed the steps you need to follow in order to replace the door lock motor in a Kitchenaid double wall oven…
Step 1: Switch off the oven’s circuit breaker to avoid the risk of electrocution.
Step 2: Put on some safety gloves and open the oven door.
Step 3: Using a Philips head screwdriver, take out the screws which hold the upper vent panel of the lower or upper oven depending on which motor you want to replace.
Step 4: Remove the vent panel.
Step 5: Take out the two screws which secure the door lock motor to the oven using a quarter inch wrench. The motor is in the opening where you removed the vent from.
Step 6: Push the door motor assembly back then pull it out.
Step 7: Note where each wire goes on the door lock motor. If it’s too difficult to remember, take a picture.
Step 8: Disconnect the wires.
Step 9: Get a new door motor assembly and connect the wires to it. Make sure each one goes to the right place.
Step 10: Push the motor in and hook it on the mounting tab.
Step 11: Return the two screws which hold the motor in place.
Step 12: Reposition the vent.
Step 13: Hold it in place with the four screws.
Step 14: Shut the door and switch the circuit breaker back on.
Also follow the steps above if your Kitchenaid double wall oven won’t unlock once it has cooled down after self cleaning.
The video below will show you how to replace the door lock assembly in a Kitchenaid oven.
Follow the steps below if your Kitchenaid double range oven won’t self clean or it won’t unlock after self cleaning…
Step 1: Switch off the breaker or unplug the power cord from the outlet.
Step 2: Open the door of the upper oven or lower oven depending on which door lock assembly you want to replace. If it doesn’t open, try using the hook of a clothe hanger to pull back on the door latch in order to release the door.
Step 3: Take out the two screws at the front of the oven frame which hold the door latch. Do this with a Philips head screwdriver.
Step 4: Using the same screwdriver, take out the two screws which hold the brace of the upper rear panel. There will be one screw on each side.
Step 5: Take out the screws which hold the lower rear panel of the oven.
Step 6: Set the panel aside.
Step 7: Disconnect the wire plug connected to the door lock assembly.
Step 8: Take out the screws which hold the door lock assembly to the oven using the Philips head screwdriver.
Step 9: Remove the door lock assembly.
Step 10: Get a new door lock assembly.
Step 11: Position the assembly on the oven and hold it in place with the screws.
Step 12: Connect the wire plug to the door lock assembly.
Step 13: Reposition the oven’s lower back panel and secure with the screws.
Step 14: Return the upper panel brace and the screws which hold it in place.
Step 15: Return the two screws at the front of the oven which hold the door latch.
Step 16: Shut the door and switch the circuit breaker back on or plug the power cord back into the outlet.
Watch the video below for a visual of how to replace the door lock assembly in a Kitchenaid double range oven.
Check out these articles…
Frigidaire Oven Smells [How To Fix]
Frigidaire Oven Smoking [How To Fix]
Frigidaire Stove Knobs… [How To, Problems & Solutions]
Kitchenaid Oven Lock [How To, Issues & Solutions]
Kitchenaid Oven Heating [Problems & Solutions]
Kitchenaid Oven Dead After Self Cleaning — How To Fix
If your Kitchenaid oven doesn’t turn on after self cleaning, the thermal fuse has burnt out. To get your oven working again, you will need to replace the fuse. We will show you how to replace the fuse in a Kitchenaid double wall oven and a Kitchenaid range oven. To replace the thermal fuse in a Kitchenaid double oven, simply follow the steps listed below…
Step 1: Locate the circuit breaker for your oven and switch it off. This is to avoid the risk of electrocution.
Step 2: Open the upper and lower oven doors.
Step 3: Take out the four screws on the oven frame using a Philips head screwdriver. These screws hold the oven to the cabinet.
Step 4: With the help of an assistant, pull out the oven to about four inches.
Step 5: Take out the two screws which hold the control panel mounting brackets using a quarter inch nut driver or a Philips head screwdriver. There will be one screw on each side of the control panel.
Step 6: Using the same screwdriver, take out the four screws which hold the control panel assembly to the oven. There are two screws on each side.
Step 7: Lift and lower the control panel.
Step 8: Disconnect the wire plug connected to the control panel and the green grounding wire as well.
Step 9: Set the panel aside.
Step 10: Disconnect the wires connected to the thermal fuse using a pair of needle nose pliers.
Step 11: Lift the thermal fuse off the mounting bracket.
Step 12: Get a new thermal fuse.
Step 13: Position the studs of the thermal fuse into the mounting bracket.
Step 14: Connect the wires to the terminals of the thermal fuse.
Step 15: Take the control panel back to the oven.
Step 16: Connect the wire plug and green grounding wire to the control panel.
Step 17: Secure the control panel assembly to the oven with the four screws.
Step 18: Reposition the control panel brackets and hold them in place with the two screws.
Step 19: Push the oven back into the cabinet.
Step 20: Align the trim pieces of the oven on the cabinet.
Step 21: Secure the oven to the cabinet using the four screws.
Step 22: Shut the door of the upper oven and the door of the lower oven.
Step 23: Switch the circuit breaker back on.
If you would like a visual of how to replace the thermal fuse in a Kitchenaid oven, watch the video below.
Below, we walk you through the steps you need to follow in order to replace the thermal fuse in a Kitchenaid range oven…
Step 1: Pull the oven away from the wall and unplug the power cord from the outlet. You could also switch off the circuit breaker.
Step 2: Turn the oven around.
Step 3: Take out the three screws on the right side of the oven’s rear which secure the side bracket. Do this with a Philips head screwdriver.
Step 4: Take out the other screws on the left side which secure the other bracket.
Step 5: Lift up the back to detach it from the oven.
Step 6: Disconnect the two wires connected to the terminals of the thermal fuse. You will see the thermal fuse close to the terminals of the broil element.
Step 7: Take out the screw which holds the thermal fuse to the oven’s rear.
Step 8: Connect the two wires to the terminals of the broil element.
Step 9: Lift the back panel and position the tabs on the top and bottom into the slots in the oven’s rear.
Step 10: Return the brackets on the sides of the sides of the oven and hold them in place with the screws.
Step 11: Plug the oven’s power cord back in or switch the circuit breaker back on.
Step 12: Return the oven to its usual position.
Watch the video below for a visual of how to replace the thermal fuse in a Kitchenaid range oven.
Why Does Self Clean Break Kitchenaid Ovens?
Since high temperatures are used during self clean to burn off grease and baked on food bits, the self clean feature isn’t really safe. Some components in the oven get damaged when exposed to high temperatures. One of these components is the thermal fuse. Once the thermal fuse has been exposed to very high temperatures, it will most likely burn out. When the thermal fuse burns out, the oven won’t won’t turn on. If you would like to replace the thermal fuse in a Kitchenaid oven yourself, read the section directly above this one.
How Does A Kitchenaid Oven Self Clean Feature Work?
The self clean feature in a Kitchenaid oven works by using high temperatures to burn off any baked on pieces of food and grease. When the self clean feature is selected, the oven locks automatically. The oven begins to heat up.
As the oven gets hotter, the food bits and grease in the oven start turning to ash. Note that you may see smoke during the process. To make sure the smoke isn’t trapped, make sure to open all your windows before using this feature. Also ensure that you keep kids and pets away from the oven. As it gets very hot during the process.
Kitchenaid Aqualift Self Clean Instruction
To use the aqualift feature in a Kitchenaid oven, follow the steps listed below…
Step 1: Wait for the oven to cool down completely.
Step 2: Once the oven has cooled down, open the door and take out the racks.
Step 3: If there any loose bits of food in the oven, wipe them out.
Step 4: If you oven is a gas one, pour 1 3/4 cups distilled or filtered water on the oven’s bottom floor. If your oven is electric, pour 2 cups distilled or filtered water on the bottom floor.
Step 5: Close the door of the oven.
Step 6: Press the “Aqualift” button. If there isn’t a button like this, press the menu button and scroll through the options to select “Aqualift”.
Step 7: Press the “Start” button.
Step 8: Once the cycle is over, leave the oven to cool down a bit.
Step 9: Afterwards, open the oven door and scrub off any food bits in the oven.
Step 10: Wipe the oven interior with a cloth.
Step 11: Return the racks to the oven.
Step 12: Shut the oven door.
The video below talks about the aqualift feature in a Kitchenaid oven and how to use it.
Kitchenaid Oven Self Clean FAQ
Is It Safe To Self Clean Kitchenaid Oven Racks?
No, it is not. If you leave the racks in the oven during the self clean cycle, they will warp and get discolored.
What Temperature Does A Kitchenaid Oven Self Clean At?
A Kitchenaid oven can get to about 930 degrees F during the self clean cycle.
How Long Does It Take To Self Clean A Kitchenaid Oven
Depending on what you set the oven to, a Kitchenaid can self clean from 3-5 hours.
Why Is My Kitchenaid Oven Door Locked After Self Cleaning?
After the self clean cycle is over, the oven door stays locked till the oven has cooled down. This is to prevent the user from getting injured because of the oven’s temperature. As soon as the oven has cooled down, the door should unlock automatically. If it doesn’t, the door motor is faulty.